Showing posts with label big kid stuff. Show all posts

Tuesday, February 22, 2011

Receiving Blanket PJs

Now that the kids are getting older and the factory is closed (yes, I'm admitting it now..) I decided it was high time to clean out drawers and get those little flannel infant receiving blanets out of their rooms. You know the ones, the cute packages that are so fun to get and give at showers, that match the washcloths, onesies, and sockies so you get the whole pink and purple (or green and blue) collection. You know what I'm talking about.

But once the baby is bigger than a minute, they outgrow the receiving blankets and then you are left with a stack of square shaped flannel. What to do with it?

Well, if you're me, you cut them up and make pajama pants for your BIG kids!

I actually had this on my to-do list for over a year and HAD to get it done, or my oldest would be too big for them!


You do have to use two blankets per pair once the size is above about a 2, which is why the legs are mix-matched.


I had two of the same blanket for this pair, and put a pocket on the backs instead of putting tags to show where the back is.


I actually made them a little too big, which means maximum wear! Right now they have to roll them up -- or run while holding their pant legs up, quite amusing actually -- but they should get a year or two out of each pair!


After the trial run was approved by the populace I had some more blankets, so I made 4 more pairs!


So glad I finally got that off my list AND got rid of a huge pile of flannel blankets!


Repurpose, baby!

Wednesday, October 20, 2010

Grown Up Dresses

Ok, so after begging and pleading my two- and four-year-olds to pleeeeease take pictures with my phone... their eager little hands snapped a couple of decent ones of me modeling the dresses. I made the blue and white one weeks ago, but never got around to wearing it until today. I threw the black one on for pics while I was in a modeling mood :)


Fun huh? I promise a tutorial for this soon!

Tuesday, October 19, 2010

Zippy Pouch Tutorial {and Giveaway!!!!} {Giveaway CLOSED}

Remember the Zippy Pouch I showed off a few posts ago? How about a tutorial? Okay, great! Here are the instructions with pictures.


To make the Zippy Pouch, you will need:

*Scraps of two different fabrics (about 1/4 yard of each)
*Scissors or a Rotary Cutter
* Cutting Board or Ruler
*Sewing Machine
*Pins
*9-inch zipper
*Fusible interfacing

Fabric cuts:
*Outside of bag: Two 8-inch by 10-inch pieces of fabric
*Lining: Two 8 x 10 pieces
* Strap: One 2.5-inch by 6 inch piece (longer (9-12 inches) if you want a wristlet handle, shorter (3-5 inches) if you just want to clip a key ring to it)
*Zipper End covers: Two 1.5x2.5 pieces in the contrasting fabric
*Interfacing: two 8x10 pieces, and one to fit the strap piece


1. Fuse the interfacing into the main fabric. Go ahead and fuse the strap piece too, and set it aside.


2. Fold the zipper end covers in half lengthwise (bring the short ends together) and press. The photo below shows the full size piece on top, and the folded piece on bottom.


Now, open it up and fold the ends in to the fold and press. (Basically, you are making a very short piece of binding/bias tape).


Insert the end of the zipper into the piece all the way to the fold. You may need to trim the end of the zipper some. Be sure to cover the little metal piece up enough that when you stitch over it you won't break your needle on it.


See? Nice and snug in there. Now, stitch very close to the edge of the cover, being careful not to hit that metal piece.


For the other end, repeat the process with the pressing and folding, but this time open the zipper (to get the zipper pull out of the way) and pin the zipper closed. Stitch the same way as before, very close to the edge, being careful to avoid the metal piece.


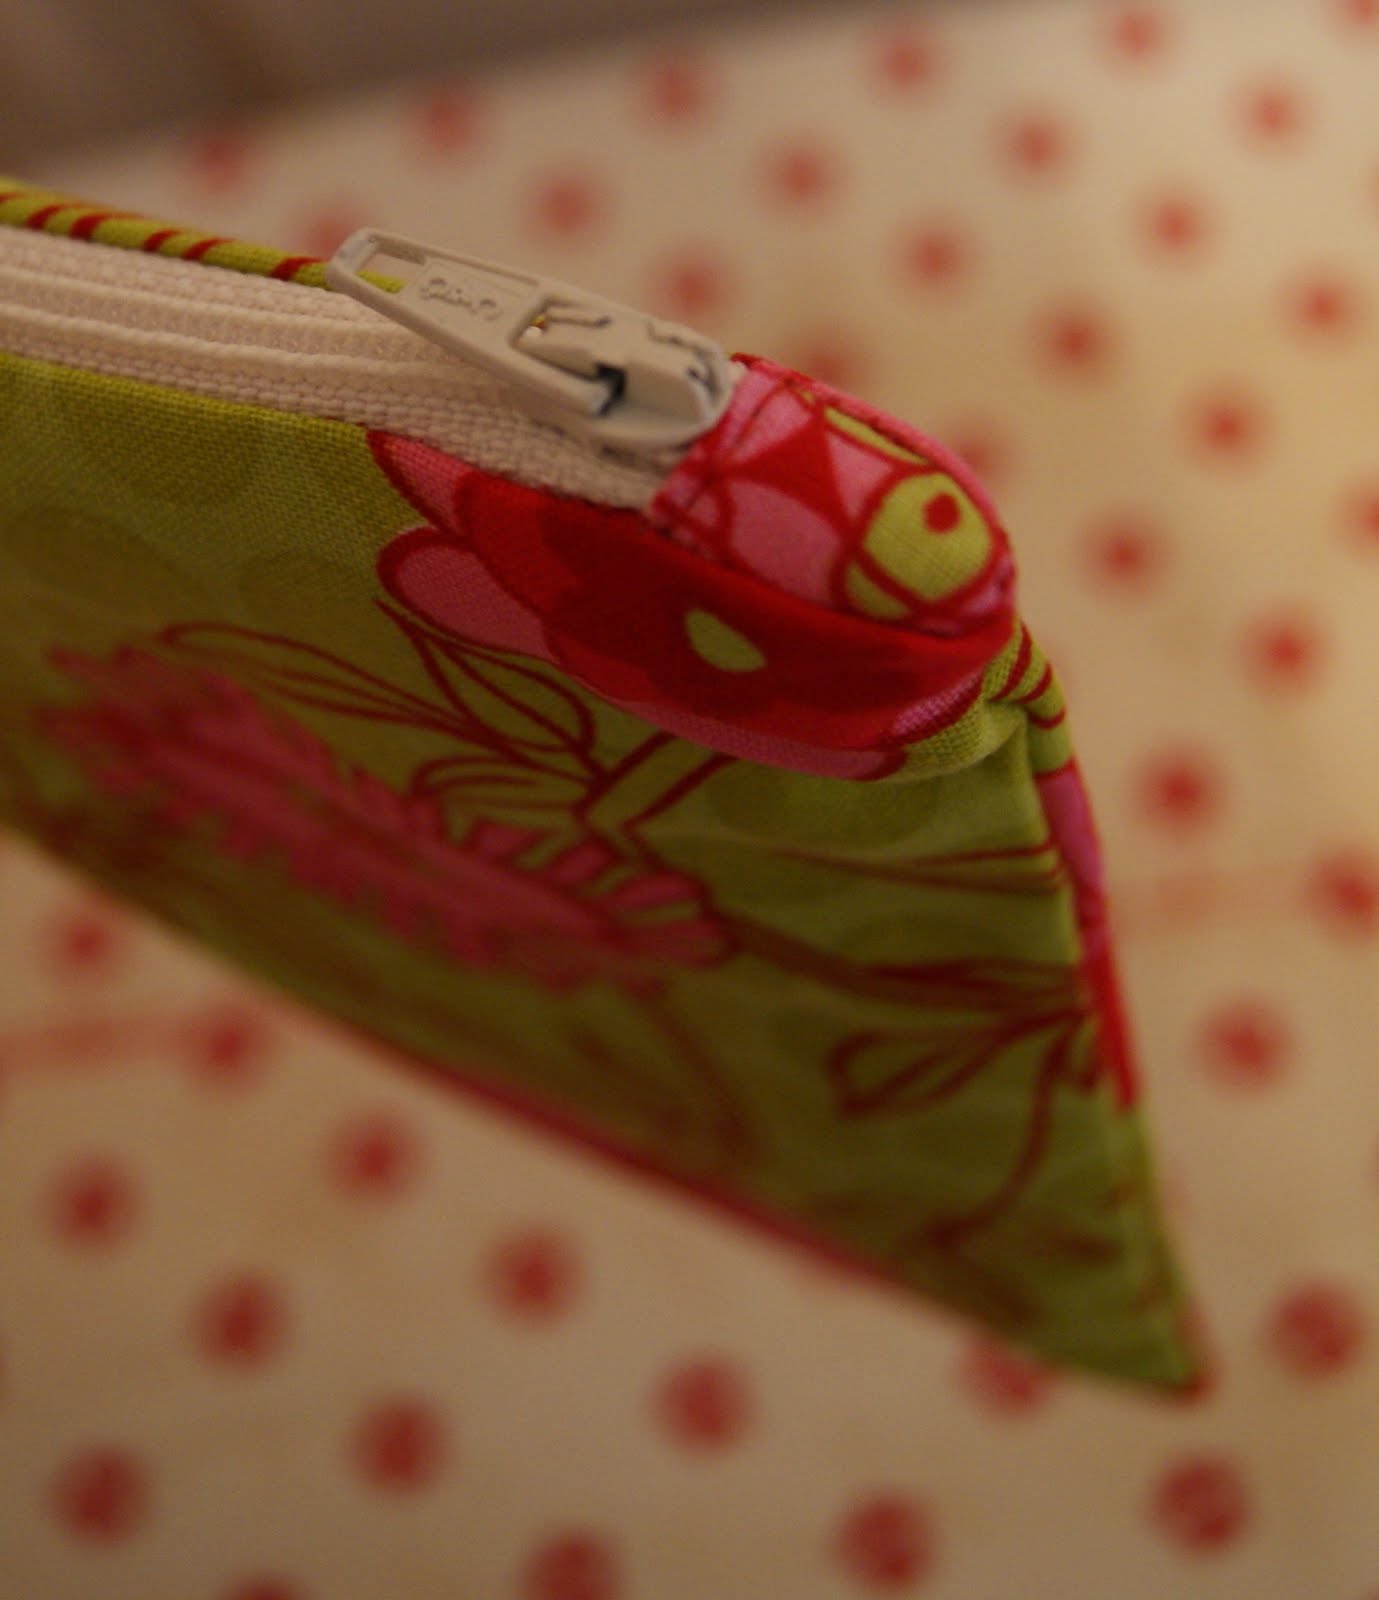
Here is your zipper after the ends are sewn on.


Now, take your main fabric and lay it on your surface. Place the zipper on it, right side down with the zipper pull on the left.


Then place your lining fabric on top, right side down, lining up the top edges neatly. Pin in place.


Stitch the entire length of the fabric, through the zipper ends, on the outside edge of the zipper. Turn the whole thing so the wrong sides of the fabrics are together, and press.


Next, lay your second main fabric piece on your surface, right side up. Lay the pressed piece we've been working on on top, main fabric down. Then lay your last peice of lining fabric on top, right side down. Pin all pieces together. Be sure your like fabrics are together-- lining to lining and main to main. Stitch in the same way as before - close to the zipper but not too close, on the outside edge. Hopefully this picture shows the stack well.


Once you stitch, you will have this:


Now it's time to make the handle. Fold your fabric lengthwise, right sides together, and stitch with a small seam allowance.


Turn the tube to the outside using a safety pin, loop turner, or this simple but ingenious trick.


Press the strap flat with the seam in the middle. Topstitch close to both edges if desired. (I did.)


Arrange the fabrics to that the like pieces are together now. Pin your strap near the zipper, in between the main fabric layers. Be sure the raw end of fabric match up and the strap goes toward the inside.


Also, pull the zipper end covers toward the lining fabric, which make the zipper itself fold toward the main fabric. Be sure to sew it like that. Stitch around the entire rectangle of fabric, leaving a 3-4 inch gap in the bottom of the lining for turning. Also, when sewing over the zipper ends, try to sew right next the them, and not through them. If you have to sew through them, it's okay too.


Almost finished! Clip the corners and turn the bag right side out. Press the lining, and sew the hole closed, stitching very close the the edge.


Stuff the lining inside the bag, and press the entire bag.. And there you go! Stuff some stuff inside and go show it off!


p.s. This is what your zipper ends should look like:


Nifty, huh?


{GIVEAWAY CLOSED}
Now, for my surprise! One lucky reader is going to WIN this bag! To enter, all you need to do is leave a comment on this post, telling me if you understood the instructions well enough to make a bag yourself! If there is anything I left out, feel free to tell me. I'm still working on my tutorials, and want to know if they are any good :-)

Also, for additional entries you can:
*become a follower of my blog
*become a fan on Facebook (or "like" me)
*post a blog post about the giveaway/tutorial on your blog and leave me the link in a comment
*post about the giveaway/tutorial on your Facebook status and tell me about it

Remember, leave a separate comment for every entry. Which means you can have up to five comments! If you are already a follower or fan, I still need you to leave a comment for each.

I'll randomly pick a winner on Monday, November 1st.. so you have until then to enter!

Go get busy!

Friday, October 15, 2010

Tween Room


This project.... I worked on in stages for about 8 months. I finally got some pictures of it! Dreadful, disgraceful pictures taken with my iPhone, but pictures nonetheless. Others may have heard me refer to this project as "The Minky Room" or even "The biggest mistake I've ever made," or even "The project from HADES!!!!!" But the end result is great, huh?

*Just pretend, for one minute, that the photos are decent.*

The photo above is floor-to-ceiling reversible curtains with huge black tassel trim.. altogether weighing 22 pounds! Below is the view from the inside of the curtains into the room. In the background is the left bed with green/zebra curtains.


The curtains under the loft bed.. also reversible and quite heavy!


The reverse side of the loft bed curtains.. makes a cozy little homework nook/cave!


By far the most unique (and difficult!) thing in the room.. a valance for an arch-top window. *Pardon the blinding sunlight*


And a straight version of the same valance..


I was pleasantly surprised at how good it looked. All I saw were giant mounds of orange, lime, zebra, and pink minky all over my office for months, and never got to see the end product all at once. I'm pretty proud!

Oh yes, and don't EVER ask me to do this again with Minky. Ever. At all.

Sunday, September 5, 2010

Duvet Cover, Bed Skirt and Shams

I finally got around to making my daughter's big girl bedding this weekend. I'm pretty happy with the way it turned out. I need to fluff the bed a bit more with pillows and frufrus but for the basics, I'm pleased!

The duvet cover is done with Amy Butler's Love fabrics. I stuffed an old comforter in it, and as you can see at the bottom I'm still working out the kinks to get it to fall straight.


For the back of the duvet I used a queen size flat sheet, cheap and easy.


The shams have a small ruffle around the edges. I did a 12-stitch pleat, mostly by hand since my pleater is on the fritz. again.


For the backs of the shame I used scraps, which were not quite long enough to overlap, thus the ribbon ties. The pattern goes different directions, but eh, it's the back.


The bedskirt has one double box pleat on each side. I used an old sheet for the decking.


Closeup of the pleat. It started as a simple box pleat but I wanted it to kick out more so I folded it an extra time under there, which did the trick nicely.


I'm pleased with the outcome and surprised at how easy it was! Really, it was easy. So easy I thought about writing a tutorial for it. Is anyone interested?

Friday, January 29, 2010

Tote Bags

Lots and lots of bags... at the top are a few I've recently done, and below are one that are available. Not all are on my etsy site, so if you see one, email me! alexiajeandesigns@yahoo.com


Related Posts Plugin for WordPress, Blogger...